Upgrading your garage lighting is a game-changer. Not only does it enhance safety and visibility, but it also boosts the functionality and aesthetics of your workspace. Hexagon lights are a modern and customizable solution that can transform your garage into a bright, inviting, and efficient area. In this DIY guide, we'll walk you through the steps to install hexagon lights and elevate your garage to the next level.
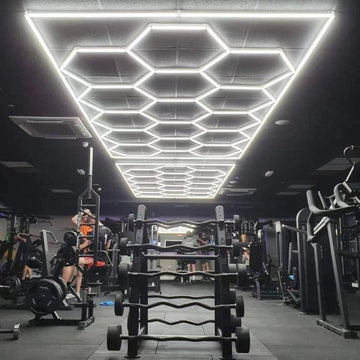
Why Choose Hexagon Lights for Your Garage?
Hexagon lights offer a multitude of advantages for garages. They provide bright, even illumination, making it easier to work on projects and find what you need. They are energy-efficient, saving you money on electricity bills. Their customizable design allows you to create a unique and visually appealing lighting arrangement. Plus, they're durable and long-lasting, making them a worthwhile investment. Whether you're detailing cars, organizing tools, or simply need better lighting, hexagon lights are an excellent choice. Explore our selection of Hexagon Lights.
Tools and Materials You'll Need
Before you start, make sure you have all the necessary tools and materials:
- Hexagon light panels (mention specific kits or packages)
- Power drill
- Screws
- Level
- Measuring tape
- Wire stripper
- Wire connectors
- Safety glasses
- Ladder
- Gloves
Step-by-Step Installation Guide
Step 1: Planning Your Layout
Plan the arrangement of your hexagon lights based on your garage size and desired lighting effect. Consider the placement of your workbench, storage areas, and other key features. Create a diagram to visualize the layout.
Step 2: Preparing the Surface
Clean the garage ceiling or walls to remove dust, dirt, and debris. Ensure the surface is smooth and even for proper installation.
Step 3: Mounting the Panels
Mount the hexagon light panels using screws or other mounting hardware. Use a level to ensure the panels are aligned properly. Follow the manufacturer's instructions for specific mounting procedures.
Step 4: Wiring the Lights
Connect the hexagon lights to the electrical wiring. *Safety is crucial here; if you are uncomfortable or unfamiliar with electrical work, consult with a qualified electrician.* Follow all local electrical codes and guidelines.
Step 5: Testing and Adjusting
Test the lights to ensure they are working properly. Make any necessary adjustments to the panel alignment or wiring connections.
Tips and Tricks for a Successful Installation
Here are a few tips to help you achieve a successful installation:
- Use a laser level for accurate alignment.
- Pre-drill holes to prevent cracking.
- Hide wires for a clean and professional look.
Troubleshooting Common Issues
If you encounter any problems during installation, here are a few troubleshooting tips:
- If the lights aren't working, check the wiring connections and power supply.
- If the panels don't fit together properly, ensure they are aligned correctly.
- If you have wiring issues, consult with a qualified electrician.
Conclusion
Installing hexagon lights in your garage is a rewarding DIY project that can transform your workspace. With the right tools, materials, and guidance, you can create a bright, efficient, and stylish garage that meets your needs. Share your own garage lighting projects with us! Shop our selection of Hexagon Lights today and transform your garage!