
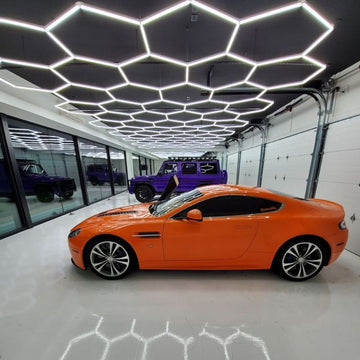




A detailing light tunnel combines overhead and vertical LED light tubes to surround a vehicle with broad, consistent illumination. Unlike ceiling-only lighting, the tunnel places light beside doors, quarter panels, bumpers and lower bodywork—the surfaces where swirls, haze, sanding marks and coating high spots can otherwise be difficult to see.
Request a detailing-bay layout and quote with your room dimensions, ceiling height, mounting surfaces and preferred configuration.

Why detailers use a light tunnel
Paint inspection depends on contrast and reflection quality, not brightness alone. A ceiling grid can provide excellent ambient and top-surface coverage, but the roof, hood and trunk are not the only areas being corrected. Light arriving from the sides helps reveal defects on doors, fenders, rocker panels and curved bodywork. The goal is not to claim “shadow-free” lighting; it is to reduce dark zones and create repeatable lines that make surface changes easier to evaluate.
- Paint correction: clearer reflections can help identify swirls, haze and polishing residue.
- Ceramic coatings and film work: layered lighting supports visual inspection for missed areas, edges and high spots.
- Photography and handoff: a deliberate light structure creates a clean, professional presentation area.
- Workflow consistency: fixed ceiling and side lights reduce dependence on moving portable inspection lamps for every step.
A tunnel does not replace a handheld swirl-finder or colour-matching lamp for every task. It provides the broad working environment; portable lights can still supply focused, low-angle inspection where needed.
Choose the right configuration
| Configuration | Best suited to | Planning priority |
|---|---|---|
| Overhead grid | Washing, general detailing and shops with limited side clearance | Even ceiling coverage without blocking doors, lifts or storage |
| Ceiling plus two side frames | Dedicated correction and coating bays | Readable reflections along both vehicle sides |
| Full tunnel | High-volume studios and presentation-focused bays | Integrated ceiling, shoulders and vertical sides with clear access paths |
| Modular or partial tunnel | Compact bays, phased upgrades and rented spaces | Expansion points, movable side frames and service access |
Plan around the bay—not just the vehicle
The correct footprint begins with the usable workspace. Measure wall to wall, finished floor to finished ceiling and the clear area around the largest vehicle you expect to service. Record garage-door tracks, lifts, ducts, sprinklers, storage doors and electrical equipment. A visually impressive frame is not useful if it narrows a walking route, prevents a vehicle door from opening or conflicts with overhead equipment.
Provide these details when requesting a configuration:
- Room length, width and finished ceiling height
- Typical vehicle types and maximum vehicle dimensions
- Desired clear working space along both sides and at each end
- Ceiling construction and available wall or floor mounting points
- Existing circuits, voltage, switch locations and desired zoning
- Garage doors, lifts, HVAC, sprinklers and other obstructions
- Whether the side lights should be fixed, wall-mounted or movable
- Photography, video or high-speed camera requirements
Lighting quality for paint inspection
Illuminance
Detailing bays generally need more light than parking or storage garages, but there is no single lumen number that fits every room. Fixture output, spacing, mounting height, wall reflectance and the distance from the vehicle all affect light at the working surface. Use a calibrated lux meter to verify the completed installation at the hood, roof, doors and lower panels. Treat lumen calculations as a planning estimate rather than a guarantee.
Colour rendering
For paint, trim and finish inspection, specify a high colour rendering index; 90+ CRI is a useful target when colour fidelity matters. CRI alone does not describe every aspect of colour quality, so compare complete product specifications and, where possible, evaluate a sample in the intended space.
Colour temperature
Neutral or daylight-range white light is commonly selected for detailing because it provides a crisp working environment. Many shops prefer approximately 4000K–5000K. Extremely cool light can feel harsh and does not automatically improve defect detection. Consistency across the ceiling and side fixtures is more important than chasing the highest number.
Flicker, glare and cameras
Ask about driver quality and flicker performance if the bay will be filmed. A light can look steady to the eye yet produce bands on camera at certain frame rates or shutter speeds. Diffused tubes and thoughtful viewing angles can also reduce uncomfortable direct glare. Verify camera compatibility under the actual recording settings before finalizing a large installation.


Mounting, power and controls
A detailing tunnel is an electrical installation, not simply a decorative frame. The complete configuration should be reviewed against product instructions and applicable local electrical requirements. A qualified electrician should confirm circuit capacity, conductor sizing, grounding, disconnects, protection and the number of permitted fixtures or modules on each feed.
- Surface mounting: keeps the ceiling array close to a low or medium-height ceiling.
- Suspended mounting: can establish a consistent light plane beneath an irregular or high ceiling, provided the suspension method is approved for the system.
- Fixed side frames: provide repeatable positioning but require careful protection from vehicles and equipment.
- Movable side frames: improve flexibility but need stable bases, cable management and clear travel paths.
- Zoning: separate overhead, left-side and right-side lighting so the detailer can control reflections and energy use.
Do not assume that every light tube, connector or power supply is suitable for damp areas, wash bays or cold spaces. Confirm the complete system’s environmental and operating-temperature ratings. Any applicable UL or CSA certification should be verified for the complete product configuration; certification addresses identified safety requirements and does not by itself establish brightness, efficiency, colour quality or service life.
How the custom quote process works
- Send the bay details. Include dimensions, photos or drawings, ceiling height, obstacles, vehicle mix and preferred mounting approach.
- Select a configuration. Choose an overhead grid, ceiling-plus-sides layout, full tunnel or phased modular build.
- Review the proposed footprint. Confirm working clearances, access, mounting points, power feeds and control zones.
- Confirm product specifications. Check tube lengths, connectors, electrical ratings, colour temperature, CRI, dimming compatibility and included hardware for the quoted system.
- Arrange installation. Follow the supplied instructions and use qualified trades where required by the product or local code.
Pricing depends on the dimensions, light layout, mounting method, controls, shipping destination and any installation-specific requirements. A measured quote is more useful than a one-size-fits-all package price.
Request your detailing light tunnel configuration and quote
Related lighting resources
- Shop garage lighting systems
- Explore garage lighting layout ideas
- Estimate how much light a garage needs
- Plan car dealership and showroom lighting
Detailing light tunnel FAQ
Is a detailing light tunnel better than ceiling lights alone?
For paint correction and coating inspection, vertical or angled side light usually adds useful visibility on doors, fenders and lower panels. Ceiling lighting remains important for general work and horizontal surfaces; the strongest layouts combine both.
What colour temperature is best for a detailing bay?
Many professional bays use neutral to daylight-range white light, often around 4000K–5000K. Consistent colour temperature, high colour rendering and controlled glare matter more than simply choosing the coolest available light.
Do I still need handheld inspection lights?
Often, yes. A tunnel creates broad, repeatable illumination, while handheld or portable lights can provide a concentrated, low-angle view for specific defects and final checks.
Can a tunnel fit a small garage?
A partial system may fit compact spaces, but it must preserve walking space, door opening, equipment access and safe clearances. Provide exact room and vehicle dimensions before selecting a configuration.
Can the side lights be movable?
That depends on the selected system and approved mounting hardware. Movable frames can make a multi-use bay more flexible, but they need stable bases, protected cabling and a clear path around the vehicle.