




Quick answer: Car dealership lighting should make vehicles easy to inspect, keep paint colours believable and guide customers comfortably from the entrance to the display floor. As a planning starting point, many showrooms use approximately 500–750 lux on general display areas, with 750–1,000 lux or more on featured vehicles. Service reception, offices and circulation areas usually need less. The final design should be verified at the actual vehicle surfaces because ceiling height, glazing, daylight, fixture distribution and dark finishes can materially change the result.
Why car showroom lighting needs a layered design
A dealership is not one uniform room. It combines a retail showroom, a workplace, a brand environment and, often, a vehicle handover or detailing area. One ceiling grid at a single output level rarely serves every task equally well.
Good dealership lighting typically combines three layers:
- Ambient lighting provides even visibility and comfortable circulation across the showroom.
- Accent lighting creates contrast around hero vehicles, new launches and branded displays.
- Vertical and task lighting reveals vehicle sides, supports inspection and illuminates desks, signage and consultation areas.
The goal is not simply maximum brightness. Excessive output can produce glare on windshields, distracting reflections on polished paint and an uncomfortable experience for customers and staff.

Recommended lighting levels by dealership area
Use illuminance targets as an initial design brief, not as a guarantee from fixture wattage or total lumens. Measurements should be taken at the relevant working plane and, for vehicles, on both horizontal and vertical surfaces.
| Area | Starting target | Design priority |
|---|---|---|
| General showroom floor | 500–750 lux | Uniform visibility with controlled reflections |
| Feature or launch vehicle | 750–1,000+ lux | Visual emphasis without harsh glare |
| Customer reception and sales desks | 300–500 lux | Comfort, facial visibility and paperwork |
| Vehicle handover bay | 500–750 lux | Clear inspection of exterior and interior details |
| Detailing or paint-inspection area | 750–1,000+ lux | High CRI, vertical light and defect visibility |
| Service drive or write-up lane | 300–500 lux | Safe movement and readable vehicle condition |
| Circulation and lounge areas | 200–300 lux | Comfort and visual hierarchy |
Local codes, brand standards and the needs of a lighting designer or electrical professional take precedence. A dealership with a high glass frontage may need daylight-responsive controls, while a dark, high-ceiling showroom may require more fixture output to achieve the same measured level.
Choose colour temperature for the space and brand
For most vehicle showrooms, 4000K to 5000K is the useful starting range. Around 4000K creates a clean but comparatively comfortable retail atmosphere. Around 5000K appears cooler and can create a crisp, high-energy presentation that suits technical, performance or detailing environments.
Avoid mixing noticeably different white tones across the same vehicle display unless the contrast is intentional. Inconsistent colour temperature can make adjacent paint surfaces appear different and can weaken the visual continuity of the showroom.
Warmer light can still work in lounges, hospitality areas or luxury-brand consultation zones. Keep the transition deliberate so customers understand the change in function rather than seeing it as mismatched lighting.
Prioritize CRI and colour consistency
Colour rendering is especially important where customers compare paint, upholstery and trim. For the main showroom, specify at least CRI 80 as a baseline and consider CRI 90+ where accurate colour evaluation is a priority. For detailing, photography, paint correction or premium vehicle handover, higher colour fidelity is generally the better choice.
CRI alone does not describe every aspect of colour quality. Also look for consistent output between fixtures and ask for available colour-quality data when exact paint appearance matters. HexaGara’s guide to high-CRI lighting for car detailing shops explains why this becomes particularly important during inspection work.
Control reflections on cars, glass and polished floors
Cars are highly reflective objects. Customers will see the lighting system repeated across roofs, hoods, windshields and side panels, so fixture placement becomes part of the vehicle presentation.
- Use broad, orderly overhead patterns rather than random bright points.
- Avoid placing the brightest source directly in a customer’s typical line of sight.
- Test reflections from standing and seated viewing positions.
- Add vertical or angled light when vehicle sides remain dark.
- Use dimming or separate circuits around display zones and large windows.
- Consider how glossy tile and glass partitions multiply visible reflections.
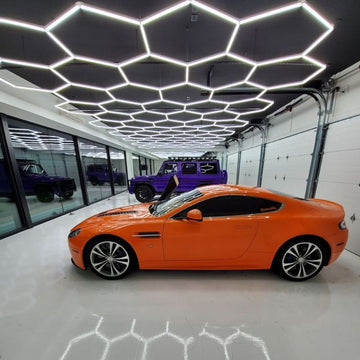
Geometric LED systems can create a deliberate reflected pattern across vehicle paint while distributing light over a wide area. They should still be planned around the car positions rather than installed solely for ceiling symmetry. Explore hexagon and honeycomb LED lighting for modular overhead layouts.

Plan the showroom as lighting zones
Entrance and window displays
Daylight can make front-row vehicles look excellent during the day but comparatively flat after sunset. Put window displays on their own control zone and evaluate them in both conditions. Automatic dimming can reduce wasted output near glazing while preserving the intended contrast deeper in the showroom.
Main vehicle display floor
Aim for consistent ambient coverage, then create focal points with accent or higher-output zones. Maintain clear walking paths and avoid layouts that force customers to look directly into exposed LEDs. If vehicle positions change often, a modular ceiling system or flexible track lighting can be easier to adapt than a fixed spotlight scheme.
Feature-vehicle zone
Use contrast selectively. A feature car should appear more prominent than the surrounding floor, but pushing one area to extreme brightness can make everything else look dim. Dimming gives the merchandising team more control for launches, seasonal displays and photography.
Sales desks and customer lounge
These spaces need comfortable facial lighting and enough task light for documents and screens. Lower glare and a slightly warmer or softer presentation may be more appropriate here than on the display floor.
Handover and detailing bays
Overhead lighting alone often leaves doors, rocker panels and lower bodywork in shadow. Add vertical fixtures or illuminated side walls so customers and staff can inspect the full vehicle. For technical work, review LED garage lighting options designed for workshops, service areas and detailing spaces.

Estimate fixture output without oversimplifying
A preliminary lumen estimate can help compare concepts:
Initial fixture lumens = floor area × target lux ÷ utilization allowance
For example, a 2,000-square-foot showroom is approximately 186 square metres. At a starting target of 600 lux, the working plane needs about 111,600 lumens reaching it. If a simplified utilization allowance of 0.65 is used, the preliminary fixture output becomes approximately 172,000 lumens.
This is only a concept-stage estimate. It does not account fully for ceiling height, fixture optics, maintenance, daylight, wall reflectance, display geometry or vertical illumination. Photometric modelling should be used before purchasing a large commercial system.
Layout example for a 2,000 sq. ft. showroom
Consider a rectangular showroom with six display vehicles, a glazed frontage, two sales desks and one highlighted launch position:
- Provide even ambient lighting across the central vehicle and walking zones.
- Place the frontage lighting on a daylight-responsive circuit.
- Create a separately dimmable zone over the launch vehicle.
- Add comfortable task lighting at both desks rather than relying on the display fixtures.
- Check vertical illuminance on the driver and passenger sides of every vehicle.
- Measure the finished space at night and during peak daylight before finalizing settings.
If geometric lights are used, align complete patterns with the display bays and confirm the electrical feed limits of each connected run. Broken or partial shapes at the room edges can look accidental, so allow adequate border space in the ceiling plan.
White light, RGB or both?
White light should perform the core showroom and inspection work. RGB lighting is best treated as a controlled accent for events, launch displays, content creation or brand moments. It should not replace accurate white illumination where customers assess paint colour.
A mixed approach can work well: high-quality white ambient light for everyday sales, with separately controlled RGB elements for evening events. Ensure coloured light can be turned off completely and that the normal white-light setting remains simple for staff to operate.
Energy controls and operating costs
Dealerships often have long opening hours, so controls can be as important as fixture efficacy. Divide the building into logical zones and consider occupancy sensing for offices, storage and back-of-house areas. Daylight harvesting can reduce output near the façade, while scheduling prevents display lighting from operating at full level when the store is closed.
Estimate savings using actual wattage, operating hours, electricity rates and maintenance assumptions. Avoid relying on a universal payback claim, because results vary significantly between an older retrofit and a new-build showroom.
Installation and safety considerations
- Confirm that complete fixtures and power components carry applicable certifications for the installation.
- Verify branch-circuit capacity, connected-run limits and driver requirements.
- Check ceiling structure and approved mounting methods before suspending fixtures.
- Use products rated for the temperature, dust and moisture conditions of service or detailing areas.
- Keep emergency and egress lighting independent of decorative display effects.
- Coordinate with local electrical codes, fire requirements and accessibility standards.
Large commercial layouts should be reviewed by a qualified lighting designer and installed by an appropriately licensed electrical professional. Product certification does not by itself establish brightness, colour quality, durability or suitability for every environment.
Car dealership lighting checklist
- Define a measured lux target for every functional zone.
- Specify colour temperature and minimum CRI.
- Model both horizontal and vertical illumination.
- Review glare and reflections on actual vehicle positions.
- Separate window, feature, desk and back-of-house controls.
- Plan for layout changes and future display vehicles.
- Verify electrical loading, mounting and local-code requirements.
- Commission and measure the completed installation.
Frequently asked questions
What is the best colour temperature for a car showroom?
Most showrooms start between 4000K and 5000K. Choose 4000K for a clean, balanced retail feel or 5000K for a cooler, crisper presentation. Use one consistent white tone across adjacent vehicle displays.
How many lux should a car showroom have?
Approximately 500–750 lux is a useful planning range for a general display floor, with 750–1,000 lux or more for feature vehicles, handover or inspection zones. Final values depend on brand standards, ceiling height, daylight, reflectance and local requirements.
Is CRI 90 necessary for dealership lighting?
Not every area requires CRI 90, but it is valuable where accurate paint, upholstery and trim appearance matters. CRI 80 can serve as a general baseline; detailing, photography and premium handover areas benefit most from higher colour fidelity.
Are hexagon lights suitable for car showrooms?
Hexagon lights can provide broad overhead coverage and a distinctive geometric reflection on vehicle surfaces. Layout, glare, output and electrical limits must still be planned for the specific ceiling and vehicle positions.
Why do vehicle sides look dark under bright ceiling lights?
Horizontal overhead light strongly illuminates roofs and hoods but may not reach vertical doors and lower panels at useful angles. Supplemental wall-mounted, vertical or angled lighting improves side visibility.
Should a showroom use RGB lighting?
RGB lighting is useful for events and accent zones, but accurate white light should remain the primary source for everyday vehicle display and colour evaluation.
Build a showroom lighting plan
Start with the vehicle layout, the customer journey and measurable lighting targets—not fixture shape alone. Once each zone has a defined purpose, compare overhead systems, task lighting and controls that can achieve the required coverage. Browse HexaGara’s hexagon lighting systems for display ceilings and garage and detailing lights for service, handover and inspection areas.
Adding an in-house vehicle preparation or correction bay? Explore custom detailing light tunnel configurations with overhead and vertical illumination.

