
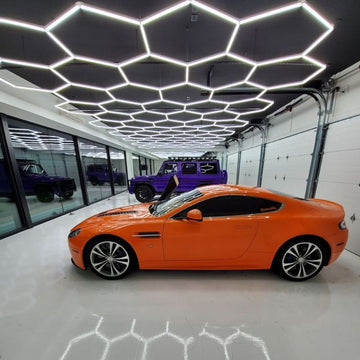








Good garage lighting is not one bright fixture in the middle of the ceiling. The most useful designs layer broad ambient light with focused illumination at workbenches, storage walls and vehicle sides. The right layout depends on whether your garage is mainly for parking, repairs, woodworking, detailing, fitness or several uses at once.
This guide presents practical garage lighting ideas for one-, two- and three-car spaces. It focuses on fixture placement and visual design. For brightness calculations by floor area and activity, use our garage lighting calculator and lumen guide.
Quick garage lighting design principles
- Light zones, not just square footage. Parking bays, benches, cabinets and wash areas have different needs.
- Distribute ceiling light. Several well-spaced fixtures usually create more useful coverage than one high-output fixture.
- Add task lighting. Place dedicated light over a workbench, tool wall or inspection surface.
- Light vertical surfaces for detailing. Ceiling light alone can leave doors, rocker panels and wheel arches comparatively dark.
- Control glare. Bright exposed LEDs should not sit directly in the normal line of sight.
- Use separate switches or dimming zones. You rarely need every light at full output for every task.
1. Build a layered two-car garage
A versatile two-car garage benefits from three layers: broad ceiling coverage over both parking bays, task light at the workbench, and optional vertical or angled light for vehicle inspection. A modular hexagonal ceiling grid can create an even visual rhythm across a wide ceiling, while linear fixtures under cabinets or above a bench put light where hands and tools create shadows.
Keep the ceiling layout clear of garage-door tracks, openers, attic hatches and storage lifts. Before choosing a grid size, draw the full ceiling and mark every obstruction. If the garage door sits close to the ceiling when open, verify that neither the fixture nor its suspension hardware enters the door’s travel path.

2. Use a simple one-car layout
In a narrow one-car garage, arrange linear fixtures lengthwise or use a compact geometric grid centered over the usable floor area. Avoid placing all the light directly over the vehicle roof; that can make the floor edges, shelving and vehicle sides harder to see. Shifting some output toward both sides of the bay improves access when doors are open.
If one wall contains shelves and the other is a walking path, favor the active side with a parallel fixture run. A small task light beneath a shelf can be more effective for tool work than increasing the output of the entire ceiling.
3. Divide a three-car garage into zones
A three-car garage should not be treated as one large rectangle. Divide it into bays and give each bay a logical switching zone. One bay may serve daily parking, another may hold a project car, and the third may function as a gym or workshop. Independent control reduces energy use and lets you choose different light levels without compromising the overall ceiling pattern.
For a cohesive appearance, repeat fixture spacing from bay to bay. A geometric grid can span the central area, while perimeter linear fixtures fill gaps near exterior walls and cabinets. If structural beams interrupt the ceiling, use them as natural boundaries rather than forcing a continuous pattern across incompatible heights.
4. Turn a garage corner into a workshop
Workbench lighting should illuminate the front half of the surface, not the wall behind it. Position a linear fixture slightly forward of the bench so your head and shoulders do not cast the main shadow over the work. Under-cabinet lights help with close tasks, but they should supplement—not replace—comfortable ambient light.
Linkable LED shop lights are useful for long benches because they can form an orderly run. Check the manufacturer’s maximum linking limit, power-feed arrangement and mounting instructions. Use 4000K as a balanced starting point for general workshop use. For color inspection, finishing or paint work, prioritize accurate color rendering and verify the fixture’s CRI rather than relying on color temperature alone.

5. Create a detailing-friendly lighting bay
Automotive detailing requires light on the vehicle’s sides as well as its horizontal surfaces. A bright ceiling can reveal dust on the hood and roof yet leave lower doors and rocker panels comparatively dark. Vertical wall lights or portable inspection lights add reflections that make swirls, haze and uneven polishing easier to identify.
Use neutral or daylight-white lighting with high color fidelity, and avoid extreme blue or colored RGB light during paint inspection. Place vertical fixtures where their reflections can travel along the body panels without shining directly into the user’s eyes. Dimming is valuable because defects may become easier to see at different contrast levels.

6. Make a low ceiling feel brighter
Low ceilings call for slim surface-mounted fixtures and careful glare control. Suspended fixtures consume headroom and may sit in the line of sight near raised tailgates or storage racks. A shallow geometric tube system or flush linear fixture keeps the ceiling visually clean.
Light-colored ceilings and walls improve perceived brightness by reflecting more light into the space. Matte finishes are generally more comfortable than glossy surfaces, which can create distracting reflections. Do not compensate for a low ceiling by packing in excessive output; better spacing and diffusion often improve comfort more than raw lumens.
7. Use high ceilings without losing useful light
With a high or vaulted garage ceiling, fixture height, beam distribution and maintenance access become more important. A fixture that looks bright overhead may deliver less illumination to the floor and bench. Suspended mounting can bring the light closer to the working plane, but suspension points must be appropriate for the ceiling structure.
For unusually high ceilings, large commercial bays or complex machinery, a photometric plan is more reliable than a simple lumen estimate. Consider how lifts, tall vehicles and open hoods will block light. Supplemental low-mounted task lighting may still be necessary even when the overhead system is powerful.
8. Combine hexagonal and linear garage lights
You do not have to choose one fixture shape for the whole garage. Hexagonal LED tube grids suit broad ceiling coverage and create a strong geometric appearance. Linear shop lights work well over benches, storage aisles and long narrow zones. Used together, they can separate the parking area from the working area while maintaining consistent white light.
Keep color temperature reasonably consistent across fixtures. A mix of warm, neutral and cool white can make the room look patchy and may complicate paint or material inspection. Browse garage lighting solutions for mixed fixture types, or see hexagon garage lights for geometric tube-and-connector systems.
9. Add useful perimeter lighting
Perimeter lighting is especially helpful beside parked vehicles, near cabinets and along dark side walls. Linear fixtures mounted parallel to a bay can soften the sharp drop in brightness that sometimes occurs outside a central ceiling grid. They also make it easier to find stored items without switching on every fixture.
Avoid mounting unprotected fixtures where vehicle doors, long lumber or ladders can strike them. In damp, dusty or wash-down areas, confirm that the complete fixture is appropriately rated for the environment. A decorative appearance does not establish a damp-location or impact rating.
10. Light shelves and storage without glare
Deep shelving creates its own shadows. Ceiling light aimed at the aisle may not illuminate labels or bins on lower shelves. Under-shelf LED lighting can help, but wiring should be secured and protected from stored objects. Motion-controlled lighting works well inside enclosed cabinets or seldom-used storage zones.
Keep bright strips out of direct view by using an appropriate channel, diffuser or mounting angle. This produces a calmer result and reduces reflected points of light on vehicle paint and glossy cabinet fronts.
11. Create a garage gym zone
If part of the garage is used for exercise, give it a separate switch or dimming zone. Even ceiling coverage helps reduce harsh facial shadows, while careful fixture placement prevents glare when users lie on a bench or mat and look upward. Position lights around—not directly above—the most common floor exercise area where possible.
Neutral white light typically feels alert without appearing overly blue. Mirrors can make a gym feel brighter, but they also reflect exposed LEDs; review sight lines from standing, seated and floor positions before final mounting.
12. Plan for RGB as accent light only
RGB lighting can add atmosphere around a display car, gaming corner or garage gym, but it should not be the only light used for repairs, cleaning or color inspection. Keep functional white lighting on an independent circuit or control zone. That way the garage remains safe and useful when accent lighting is off.
13. Improve the layout with controls
Controls can make a thoughtful layout much more practical. Useful options include separate switches by bay, occupancy sensors for entry zones, dimming for detailing work and timers for lights that might otherwise be left on. Confirm that drivers, dimmers and sensors are compatible; not every LED fixture is dimmable.
Place switches where they can be reached from both the house entrance and the vehicle path. If local code requires three-way switching, specific box locations or particular wiring methods, include those requirements before walls and ceilings are finished.
14. Test the lighting before permanent installation
Plans and product photos cannot fully predict shadows in your garage. Before committing to every mounting point, temporarily position one or more fixtures where safe, park the vehicle, open doors and hoods, and stand at the workbench. Check the floor edges, wheel wells, cabinet faces and walking routes.
A handheld lux meter can help compare zones, but visual comfort matters too. Look for intense glare, flicker on phone video, strong reflections and dark vertical surfaces. Adjust spacing first; adding more output is not always the best correction.
15. Keep installation safe and serviceable
Follow the fixture instructions and local electrical requirements. Verify circuit capacity, power-feed limits, mounting support, grounding and clearances from garage-door equipment. Use a qualified electrician where hardwiring or local rules require one. “Plug-and-play” components do not remove the need for a safe power source and secure mounting.
Plan how failed drivers or tubes will be accessed. Avoid trapping serviceable components behind permanent storage or above an immovable lift. Keep product documentation and label control zones at the electrical panel.
Garage lighting layout checklist
- Measure floor dimensions and ceiling height.
- Mark doors, tracks, openers, beams, lifts, hatches and cabinets.
- Define parking, workshop, storage, detailing and gym zones.
- Choose ambient, task and vertical lighting for each zone.
- Check fixture ratings, CRI, color temperature, glare and flicker.
- Plan switching, dimming and sensor compatibility.
- Verify circuit load, mounting support and local code requirements.
- Test shadows and reflections before final installation.
Frequently asked questions
What is the best garage lighting layout?
The best layout distributes ambient light across the usable floor and adds task lighting at benches, shelves and vehicle sides. The exact pattern depends on garage size, ceiling obstructions and how each zone is used.
Are hexagon lights good for a garage?
Hexagonal LED tube-and-connector systems can provide broad overhead coverage and a distinctive appearance. They work best when sized to the room, positioned around ceiling obstructions and supplemented where vertical or detailed task lighting is needed.
Should garage lights run parallel or perpendicular?
Linear fixtures often work well parallel to vehicle bays or workbenches because they distribute light along the active zone. The better orientation is the one that avoids door hardware, reduces shadows and covers walking and working areas evenly.
Is 4000K or 5000K better for a garage?
4000K is a comfortable neutral-white starting point for parking and general workshop use. 5000K can feel crisper for detailing and inspection. Color-rendering quality, glare and output matter as much as the color-temperature number.
How many garage lights do I need?
Fixture count depends on floor area, target illuminance, fixture output, ceiling height and spacing. Use the garage lumen and lux guide for worked one-, two- and three-car calculations.
For a purpose-built paint-correction space, compare full and modular detailing light tunnel systems with ceiling and vehicle-side lighting.
