







Quick answer: A residential garage typically needs about 200–300 lux (19–28 foot-candles) for parking, storage and general use. A garage used for repairs, woodworking or other bench work often needs 300–500 lux (28–46 foot-candles). Vehicle detailing, paint inspection and other visually demanding work may require 500–750 lux or more (46–70+ foot-candles), supported by vertical or task lighting. The final result depends on ceiling height, fixture spacing, beam distribution, wall and floor reflectance, and where the light is measured.
Garage Lighting Targets by Use
There is no single lumen number that works for every garage. A space used only for parking does not need the same illumination as a workshop or detailing bay. Start with the activity, then consider the floor area and room conditions.
| Garage use | Starting target | Approx. foot-candles | Design priority |
|---|---|---|---|
| Parking and storage | 100–200 lux | 9–19 fc | Safe movement and basic visibility |
| General residential use | 200–300 lux | 19–28 fc | Even overhead coverage |
| Workshop and maintenance | 300–500 lux | 28–46 fc | Task visibility and glare control |
| Detailing and inspection | 500–750+ lux | 46–70+ fc | High CRI and vertical illumination |
These are planning ranges, not guarantees or substitutes for a lighting design. Commercial garages may also be subject to workplace, emergency-lighting and electrical requirements that vary by jurisdiction.
Lumens, Lux and Foot-Candles Explained
Lumens describe the total light emitted by a fixture. Lux describes how much light reaches a surface; one lux equals one lumen per square metre. Foot-candles express the same idea using square feet, with one foot-candle equal to approximately 10.76 lux. Wattage measures electrical input, not brightness.
This distinction matters because emitted lumens do not all reach the floor, workbench or vehicle. Mounting height, fixture optics, spacing, obstructions and dark surfaces can reduce useful illumination. A simple area calculation is a good starting point, but a light meter provides the best way to check the completed installation.
How to Estimate Garage Lighting
For a preliminary estimate, multiply the floor area by the target foot-candles:
Target lumens reaching the work plane = floor area in sq. ft. × target foot-candles
Then allow for light that does not reach the measured surface. For a simple residential estimate, dividing by a utilization allowance of 0.7 provides a reasonable planning buffer:
Initial fixture lumens = floor area × target foot-candles ÷ 0.7
The 0.7 allowance is not universal. Bright walls, low ceilings and broad, well-spaced fixtures may use light more effectively; dark finishes, high ceilings and poor spacing may require a larger allowance. For a commercial project or an unusual ceiling, use a photometric layout.
Garage Lighting Calculator
Enter the garage dimensions and intended use to estimate the light needed at the work plane, initial fixture lumens, and fixture quantity. This is a planning estimate; unusual ceilings, dark finishes, obstructions, and commercial projects may require a photometric layout.
Enter positive dimensions, a ceiling height, and fixture output.
Estimated lighting plan
400 sq. ft.Floor area
10,000 lmAt the work plane
14,300 lmInitial fixture lumens
3 fixturesAt 5,000 lm each
Uses a 0.7 utilization allowance. Ceiling-height adjustment: none.
Garage Lighting Examples by Size
| Example garage | Floor area | General use at 25 fc | Workshop at 40 fc |
|---|---|---|---|
| 12 × 20 ft one-car | 240 sq. ft. | Approx. 8,600 fixture lumens | Approx. 13,700 fixture lumens |
| 20 × 20 ft two-car | 400 sq. ft. | Approx. 14,300 fixture lumens | Approx. 22,900 fixture lumens |
| 24 × 30 ft three-car | 720 sq. ft. | Approx. 25,700 fixture lumens | Approx. 41,100 fixture lumens |
| 20 × 20 ft detailing bay | 400 sq. ft. | Approx. 34,300 fixture lumens at 60 fc, plus vertical lighting | |
These examples correct a common mistake: multiplying a stated high lumen-per-square-foot target while recommending a much smaller total. Always keep the area, target and allowance in the same calculation.
Worked Example: 20 × 20 ft Two-Car Garage
A 20 × 20 ft garage has 400 sq. ft. of floor area. For general use at 25 foot-candles:
400 × 25 ÷ 0.7 = approximately 14,300 fixture lumens.
If the same garage is used for repairs at 40 foot-candles:
400 × 40 ÷ 0.7 = approximately 22,900 fixture lumens.
Divide the output across several fixtures or a distributed ceiling grid instead of relying on one central source. This generally improves uniformity and reduces pronounced shadows.

Fixture Placement and Shadow Control
A bright fixture can still produce poor visibility if it is badly positioned. Space overhead lighting across the usable area and account for garage-door tracks, open doors, storage racks and vehicle positions. A single central light often leaves the perimeter, workbench and vehicle sides noticeably darker.
- Parking bays: Position overhead lighting to illuminate both sides of a parked vehicle without being completely blocked by the roof.
- Workbench: Add dedicated task lighting above or in front of the bench so your body does not cast a shadow over the work.
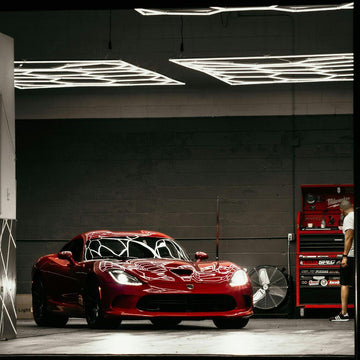
- Vehicle detailing: Add vertical or angled lights to reveal defects on doors, fenders and lower body panels. Ceiling lighting alone cannot eliminate shadows.
- Storage areas: Keep light in front of shelves rather than directly above deep shelving.
- Zoning: Separate general, workbench and accent circuits where practical, and consider dimming for high-output systems.

Color Temperature, CRI and Flicker
For most garages, 4000K–5000K is the most useful color-temperature range. A neutral 4000K appearance can feel more comfortable in a multipurpose space, while 5000K creates a cooler, crisp appearance often preferred for automotive and workshop tasks. Very cool 6000K–6500K lighting is primarily an aesthetic choice and may feel harsh in some residential garages.
Choose at least 80 CRI for general use. For paint correction, color matching, photography or inspection, 90+ CRI is more appropriate. CRI is separate from color temperature: a 5000K fixture is not automatically accurate at rendering colors.
Also check flicker performance if you record video, use slow-motion cameras or spend long periods working under the lights. Driver quality affects flicker, dimming behavior and cold-temperature operation, so review the complete product specifications rather than assuming all LEDs perform identically.
Choosing the Right Garage Light Fixture
Hexagonal Light-Tube Grids
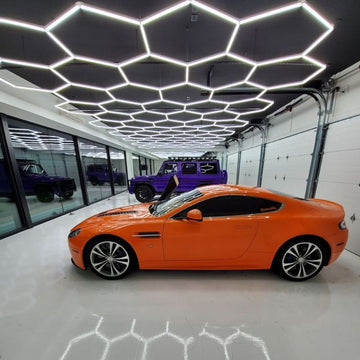
Hexagonal garage lights use interconnected LED light tubes and connectors to create a distributed geometric ceiling grid. They are not solid panels or flexible LED strips. The layout provides broad overhead coverage and a distinctive appearance for garages, workshops and detailing spaces. Hexagara systems can be surface-mounted or suspended where the product and structure permit.
When comparing grids, check overall dimensions, total tube count, light output, power-feed requirements, dimming compatibility and certification for the exact configuration. Browse hexagonal and honeycomb lights or the broader garage lighting collection.
Rectangular and Linear Lighting
Rectangular or linear fixtures can suit conventional workshops and garages where a straightforward row layout is preferred. Multiple rows usually provide better coverage than one high-output fixture in the middle of the ceiling. Align rows with work zones and vehicle bays rather than only with the room centreline.
Multidirectional and Task Lighting
Adjustable or multidirectional fixtures can help redirect light toward walls and corners, but they do not guarantee shadow-free illumination. For close work, a dedicated bench light, portable work light or vertical detailing light is often more effective than adding more ceiling output.
Installation and Safety Considerations
Confirm the fixture's input voltage, total wattage, power-feed limits, operating-temperature range and suitability for damp or dusty locations. A garage circuit must be able to support the connected load. Large modular grids may need more than one power feed according to the manufacturer's instructions.
Mount fixtures only to suitable structural surfaces using the specified hardware. Keep clear of garage-door movement and maintain access to drivers, junctions and serviceable components. Turn off and verify power before electrical work. Hardwired installation, new circuits and modifications should be completed by a qualified electrician in accordance with local codes.
If certification matters for the project, verify that the complete product configuration carries the applicable listing or certification. UL or CSA evaluation relates to identified safety requirements; it does not by itself establish lumen output, energy efficiency, CRI or service life.
Measure the Finished Result
After installation, use a light meter at the floor, workbench or other relevant work plane. Check multiple points rather than taking one reading directly below a fixture. If the average is adequate but some areas are much darker, improve spacing or add task lighting instead of simply increasing total lumens everywhere.
Dust on tubes and diffusers gradually reduces useful light, so clean fixtures with power disconnected and follow the manufacturer's care instructions. Replace damaged light tubes, connectors or drivers with compatible components.
Frequently Asked Questions
How many lumens does a garage need?
A typical garage used for parking and general tasks often starts around 200–300 lux, or 19–28 foot-candles. Multiply the floor area by the target foot-candles and include an allowance for light losses. Workshops and detailing bays require higher targets.
How many lumens does a two-car garage need?
A 20 × 20 ft two-car garage targeting 25 foot-candles needs about 10,000 lumens at the work plane. Using a 0.7 planning allowance, start near 14,300 fixture lumens. A workshop target of 40 foot-candles increases that estimate to approximately 22,900 fixture lumens.
Is 5000K good for garage lighting?
Yes. 5000K produces a crisp, cool-white appearance popular in garages and workshops. Choose 4000K if you prefer a more neutral and comfortable look. Color temperature does not indicate CRI or brightness.
What CRI is best for a garage?
80+ CRI is suitable for general parking, storage and maintenance. Choose 90+ CRI for paint correction, color inspection, photography or other work where accurate color rendering matters.
How do I reduce shadows in a garage?
Distribute overhead fixtures across the room, add task lighting at benches, and use vertical or angled lighting for vehicle sides. No overhead system eliminates every shadow, especially around vehicles and equipment.
Are hexagonal garage lights panels?
No. Hexagara's modular hexagonal systems use interconnected LED light tubes and connectors arranged into ceiling grids. They can provide broad coverage while creating the geometric appearance associated with hex and honeycomb garage lighting.
Plan Your Garage Lighting
Start with the garage's actual dimensions and primary activity, choose a reasonable lux or foot-candle target, and then confirm fixture spacing and electrical requirements. For fixture-selection and placement ideas beyond the calculations, read the complete garage lighting guide. To compare available systems, explore Hexagara garage lighting.
For visual placement examples, explore 15 garage lighting ideas. Planning a dedicated correction bay? See the detailing light tunnel guide for ceiling-plus-side configurations, measurement inputs and quote planning.

